Texturing guide for characters (Skin)
Hello everyone welcome to my blog post on texturing basics for characters. For this guide we're going to be going through my Baby Turtle Character Project and showing you how I textured the little guy. We're going to cover Substance Painter and Unreal Engine. Keep in mind this is more of a hero asset/character workflow so we're going to try and maximize quality as much as possible while still staying within reasonable constraints. This guide is also assuming you have a bake set up already and ready to dive straight into painting.
Substance Painter (Skin Material)
The first step I always like to tackle for a character is the skin. Skin is an incredibly complex thing to make believable and there's multiple ways to achieve a good look, this is my approach that I learned through J Hill and his videos on texturing humans. Skin itself has multiple layers and is by nature imperfect. The goal is to layer those imperfections so much that it feels like there's real depth happening. If you take a look at RBX imagery of people you can see all of these tiny details and imperfections; things that you would never take into consideration on a day to day basis when observing people. I believe in trying to replicate that in Substance Painter, and while initially I was hesitant that this could work on the Baby Turtle, it actually gave me the results I was looking for.
So Step 1 establish a Subdermis.
Here I establish a base blood layer with a basic roughness of around .6 to .8, the hue of the red and roughness depend per character but these are the values that I used.
Step 2 Add in dark spotches and noise with Fill layers and Masking.
We add in a fill layer of a darker hue of red, once we do that we then add in a black mask, within the black mask we then add in a fill layer.
Pictured above you can see the fill added into the mask and then a 3D perlin Noise fractal thrown in. You can find most of the fills and alphas directly in Substance Painter. Once these are added in it's up to you as an artist on how you want these noise patterns tiled and scaled on the model. My goal is to add granular detail and have it build upwards. You can see multiple added layers in the black mask and these all combine to make something very complex while staying non destructive. There is a paint layer for veins but that is more of a personal touch and definitely can be a case by case basis.
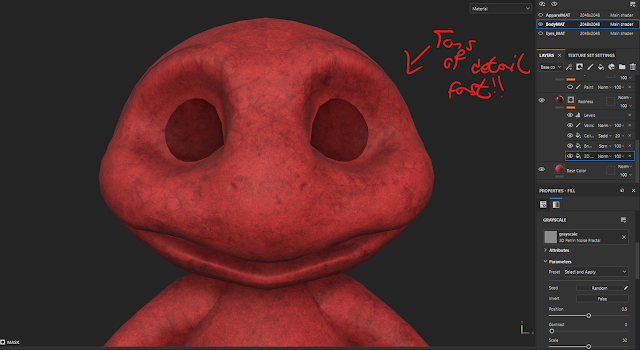
Here is how all of those layers look once revealed. Tons of detail that is quick and non destructive. I put a levels adjustment last in the black mask to make things contrast just a little bit more. Do note that some of these fills have screen blend and Sadd on them, I typically use screen because it allows for details underneath to peek through with the layer on top mixing with each other. This is another thing that is at the artists discretion for tweaking and adjustment.
Next I add in a purple layer around the eyes, for human characters this can go into more detail, you can add this around the cheeks and the chin and even more parts of the body where the skin would be thinner and less fatty. For this guy because he's so young and also more of a fantastical character I went very light on this.
SIDE NOTE!!
Please use folders to your advantage, you can see that I have a subdermis folder for anything that is subdermis. It keeps everything organized and you won't have someone breathing down your neck trying to figure out how to work with your file. Plus with the folder system you can do some really interesting global changes and use some cool masking techniques along with it. This folder structure I adopted easily allowed me to do color variations for this character.
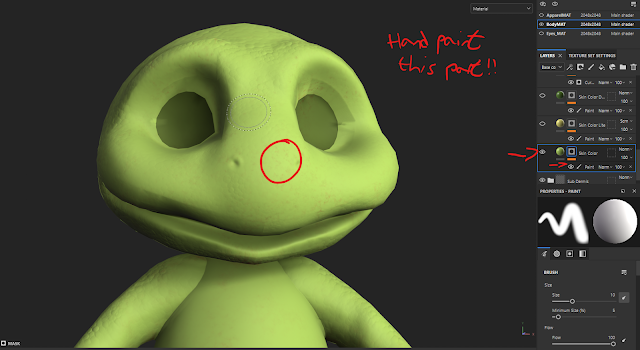
And finally we add some skin color for the character. This part is extremely important and really sells the look of any character. As you can see I add in a fill layer and then a black mask, and then you can see a paint layer within the mask. This way of adding layers instead of just adding a simple paint layer helps to keep things non destructive and easily adjustable. Note I never paint on the mask itself I always add in a fill or paint layer. I think it makes everything simple and you're technically just revealing and hiding layer info without actually committing to it.
Another note for skin I believe in using hand painted details and human error to sell a more realistic look. I paint on my skin color with maybe a dirt 3 brush or cotton brush and purposely I don't try and fill in every gap perfectly. Skin is uneven and has tons of blemishes so this is a way of combining procedural details from fills in the subdermis and having some human error in the dermis.
So typically I only have one paint layer of skin for a human character, since this isn't a human I ended up having three layers building a light layer and a dark layer. It's up to the artist on what colors they want to use I experimented with these and ended up getting something I really liked. I placed lighter parts on the front of the body and darker values on the backside/where scales are more prevalent. I also used a more speckled brush like the Dirt brushes.
This is a fun technique to add in as well for the skin. This one is specific for this character that has large scales with deep cavities in between them. We do another fill layer with a light color and then add a black mask. This black mask will then have a curvature generator. I end up turning off all the sliders minus the sharpness and the brightness slider. It happened to give me exactly what I want which is a nice contrast in all that sculpt detail. Up to artist discretion on how they want to play around with the sliders.
The next step is adding in sun damage. Now typically with humans there is tons of sun damage that typically is hard to see with the naked eye but again with some RBX Imagery you can see those imperfections. Using the same techniques from building up noise in the Subdermis we can use it for sun damage. Use a color that is darker than your skin values and even possibly a temp change but it's up to you! Above you can see it without the Sun damage.
Here it is with the sun damage. As you can see it's very subtle but it adds this nice break up that makes the skin much more uneven. You can see the different use of blend modes and the different values in the layer opacity.
Here I added in a copy of the redness layer duplicated to the top of the layer stack for the dermis but with everything turned off except for the veins. Again extremely subtle and this just is to help some more sub dermis detail pop through. You can see in the stack a lip folder this is mainly just to brighten the lips up but I found that it didn't help too much with this character. But for regular humans it is beneficial to separate the lips out since they can have their own color and specular values.
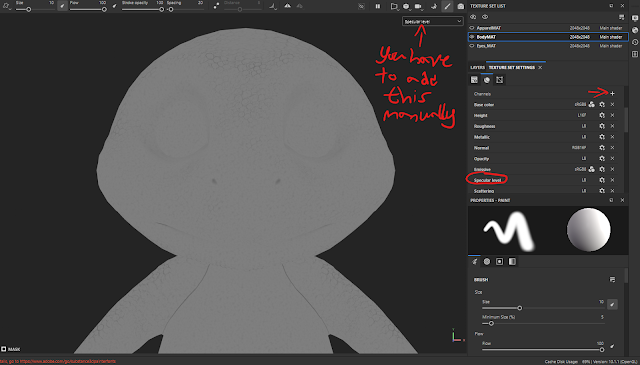
This next step is more of a personal preference of mine and not needed for every case but I like to add specular for skin because it can improve things dramatically, typically you can get away with just a .4 or .35 setting for specular in Unreal. But authoring a custom spec map can make things look awesome. We gotta add in a specular level channel manually for the shader, you can access this in the texture set settings our viewport is currently looking at my specular level for the skin. When we export we're going to change our export setting template which will be explained later in the guide!
Here I have a Spec folder, and I have a base Spec level of .4. This typically is a spec you can apply on most objects so it's nice to have it as a good base line.
Here we're adding in some noise for the spec, the same techniques I did with the subdermis and the sun damage I applied to this noise layer. It is very hard to see in the viewport but the detail is there if you look close enough. Once we take this into engine and have the material built you'll see tons of nice light break up. The spec level for this layer is .5 so some noise with some more spec overlayed on the base spec of .4
Lastly I added another fill that is for cavities using a curvature generator. The value for this fill layers spec level is 0 so zero spec in these cavities. These details will be hard to see in the viewport in substance but in engine once our map is plugged in you'll see the change.
And now it's time to add in some roughness values. I start out with a base roughness fill layer that is set to .6.
Next I add in another fill layer with .3 roughness I add in a black mask and have 3 paint layers stacked up in the black mask. Here I set the viewport to roughness to help me visualize what I painted. I used a noisy brush to paint things in so they can paint in unevenly.
SIDE NOTE!!!!
While working on this stuff I am back and forth between Painter and Unreal Engine constantly. This helps me get a consistent look and actually helps me see properly with what I'm editing. The viewport in substance doesn't quite match what Unreal renders out so it's imperative that you establish your pipeline and move back and forth constantly between your engine and painter.
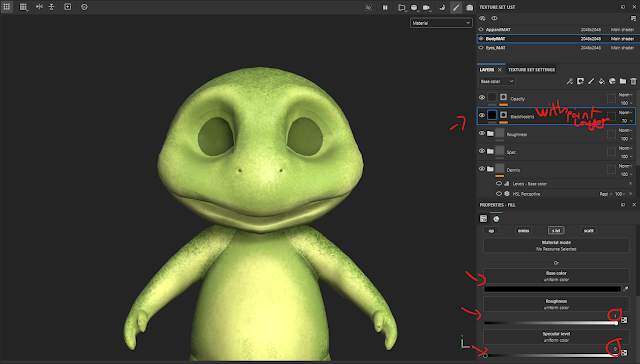
For game characters you typically don't have any sort of cavity maps, so true darks and shadow maps can be pretty low res in engine. For things like nostrils I end up adding in a fill layer with complete black full roughness and zeroed spec to add in a shadow for the nostrils. I then end up adding a black mask and paint layer to paint in the nostrils. The opacity is set to around 70 so it's not just deep black spots on his face. I end up having what looks like shadows in his nostrils but in reality it's just some paint! I also have an opacity map for scattering but I'm having issues getting it working properly so for this tutorial we won't cover it. We will cover some scattering in Unreal for Part 2!
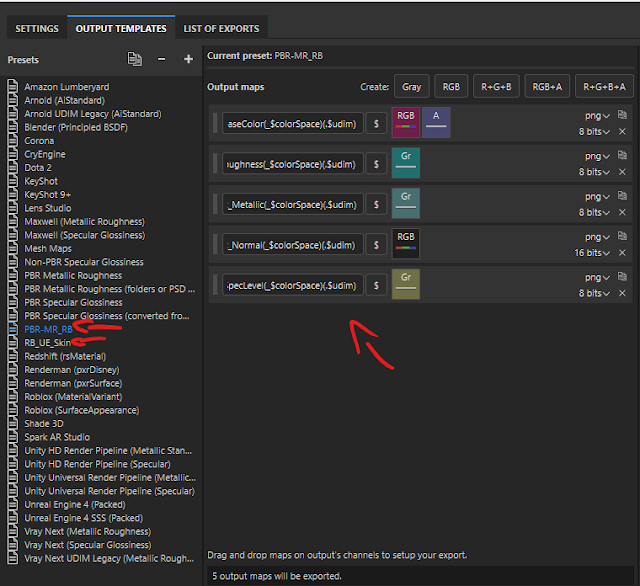
For my export settings I duplicated the basic PBR export and the Unreal 4 Packed Export settings and customized them, I put my initials on them so I can identify what they are. For the PBR I use this if I'm exporting for Marmoset, but I add in a spec level map so I can have it for my Unreal Project. Just duplicate a map clear the channels and then add a grey channel with Spec Level in it. Make sure to change the naming convention to Spec Level. But besides getting this map I export using my custom Unreal Maps export settings. These are the exact same as the preset but with an added alpha channel in the base color, for scattering!
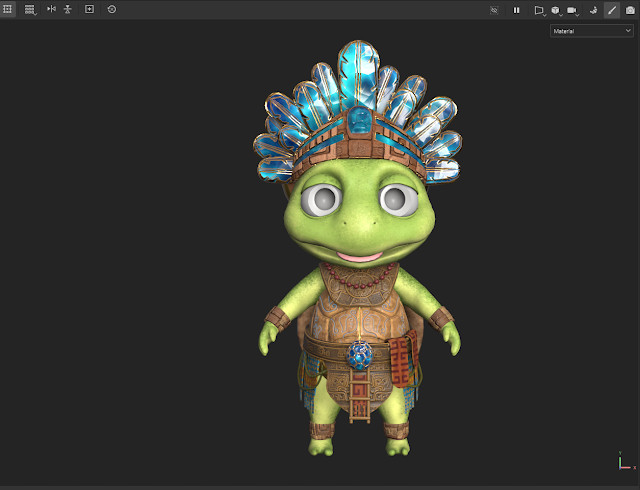
And as you can see with all of these layers built up on the skin it comes to a result that looks believable! If you use these techniques you can build up some really nice skin textures for any character. It's all about layering. These techniques helped me so much so that I used very similar techniques with the apparel of this character and it also came out to something that I am very happy with. Part 2 Should be out soon and in that part we'll be talking about setting up a skin material in Unreal Engine and amplifying all the work we did in Substance Painter.


No comments:
Post a Comment